
My main aim of learning python was to be able automate day to day jobs without having to think about them. I had gotten to the point where I was able to write a script that would call a couple of API endpoints, pull in data, clean and manipulate the data and carry out any processing required then write the data in a usable format i.e. a CSV file. The issue I faced was that I had to bother to run the script! So I will outline the steps I took to automate and forget.
Overview
In order to automate, I needed a computer that was always on. My personal laptop is not on day and night so I needed to look elsewhere - a small server. There are hundreds of companies but personally I have used Digital Ocean (starts at c. $5) and, more recently, Amazon’s LightSail (most basic is $3.50 a month). My operating system of choice is always Linux (Ubuntu) as it just works and comes pre-built with python included!
So once I had sorted where to get access to a server I needed to do the following:
- Set up the server and be able to access it
- Upload my script to the server
- Work out some way of automating the running of the script
- Somehow check whether there have been issues and, if there were, try and identify what happened
- Sit back and forget about it whilst tasks are done for me
Setting up a linux server
Go to Amazon Lightsail and get started with creating an instance (instance = server for all intents and purposes):
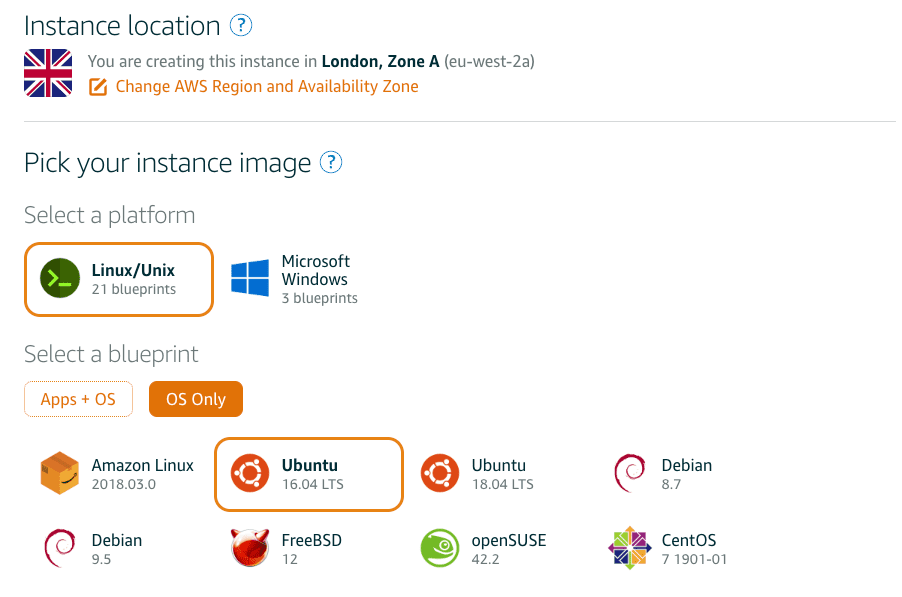
Choose ‘OS Only’ and I recommend Ubuntu 16.04. For most basic python scripts the cheapest $3.50 option is perfect.
Once the server is up and running you will see the instance along with an IP address (the string of numbers near the bottom right):

In order to be able to access the server you will need to have a RSA key pair. Effectively this provides you with a public and private key pair. The public key is added to the Lightsail instance (in set up) and the private key sits on your local machine. These are then used to ensure only those with the private key can access the server (NB: never share your private keys!). Lightsail's official documentation on SSH Keys
Open up terminal on Mac (for Windows you are going to want to use PuTTy) and type the following:
Ssh ubuntu@[your-new-ip-address]
A lot of servers have root as their default user but Lightsail uses ubuntu
You should now be connected to the server. For a great guide on setting up a server securely check out Linode's Guide on securing a server. Definitely go through these steps if you plan to use the server for anything other than a quick test.
Setting up your script
Now create a folder for your scripts and move into that folder:
mkdir python-scripts
cd python-scripts
Now at this point you can either upload your python script or clone a git repository however if your script is one file and you have no need for version control then we can just create the python file on the server and copy and paste the code directly into the file:
nano hello.py
This will open the file in a primitive text editor within the terminal.
For this example I am using a basic script I have written that will just print a formatted timestamp and ‘hello’:
# Need to import this in order to use date/time methods

import datetime

def get_time():
    # Get the time now
    now = datetime.datetime.now()
    # Format the time in to something a bit more readable
    formattedDate = now.strftime("%Y-%m-%d %H:%M:%S")
    return formattedDate

def outputText(time):
    # Print out the time and 'Hello'
    print ("{} Hello".format(time))

if __name__ == "__main__":
    outputText(get_time())
Save the file and close out of nano. Now run python3 hello.py to check all is working before moving on to automating. If it fails at this stage it will continue to fail when running automatically so always check the script works as expected.
Cronjobs and automating Python
On Linux systems there is a file called crontab and this effectively holds simple instructions on how frequently to run tasks. For this example, I am going to create a cronjob (a task within the crontab) that runs every minute and outputs anything the script produces in a log file specific to the task.
First, you need to open the crontab crontab -e and you will be asked to choose an editor. For simplicity (and if you have no preference) work with nano.
Once the crontab is open copy and paste the following line:
* * * * * cd ~/python-scripts/ && python3 hello.py > ~/python-scripts/hello.log 2>&1
Before I dig into each section this is just saying run the script hello.py in the python-scripts folder every minute and save the output (in this case what would be printed in the terminal when you ran it manually) into hello.log which is in the python-scripts folder. Anything that would be typically outputted to the terminal/command line is put in the log file. So in our case, this was the print statement however if an error is thrown this can be a great way to see whether there is an issue. The && is just a way of chaining to commands:
cd ~/python-scripts/- cd (change directory) in to the python-scripts folder- Using python3 run
hello.py > ~/python-scripts/hello.log 2>&1- this part is stating where to save the log file.2>stands for standard error and&1is the standard output (in this example the print statement is standard output)
The log files get created when the cronjob first runs.
Cronjob timing
The key piece of automating tasks is knowing when you want to run them e.g.:
- Every x minutes
- Every hour
- once a day at a set time (i.e. a daily report that emails at 9am each morning)
- First day of every month
- Only on weekdays
The way cronjobs are controlled is via the * * * * * at the start of each task. These five asterisks stand for minutes, hours, day of the month, month, and day of the week. The example above means run every minute but if we wanted it to run at 9:15 am every day then that would look like:
m h  dom mon dow
15 09 * * *
If you want to make your life easier then you can get the whole cronjob line written for you by using a simple interface that runs through each step at Crontab Generator
Checking your python script is automated
Once you have saved and closed the crontab (ctrl x and answer Y to save) your server is now ready to run through these tasks immediately.
So if not already in python-scripts folder go back in and wait a minute. After a minute if you type ls to list the files within the folder you should see hello.log and if you type cat hello.log it will output the contents of the file to the terminal:

In the above, I can see it last ran at 16:01 and all is working as expected!
Wrapping up
So the above shows how to automate the running of a basic python script and how to log any output or errors. This could be a far more complex Python script/module and the cronjob principles are the same.
As a follow up I will add a shorter blog focusing on how to run cronjobs for scripts within a virtual environment (i.e. pipenv). It is pretty much the same but you have to use the virtual environment path when calling python to ensure all of the virtual environment's requirements are loaded.